Syncing Savedata Across Platforms with SyncThing
![]()
When you start playing some of these games, there's naturally the urge to play them on multiple platforms (like a PC, laptop, and Steam Deck). This means there's going to be a need to sync settings, savedata and other files across platforms. This article is to explain how to use SyncThing to do so.
SyncThing is an open-source system to sync files.
- Each device you want to sync files to will install SyncThing. This will give them their own ID.
- Each device will them request to pair with the devices it wants to sync to/from.
- For devices that have the original files, they will need to set up which files and folders get synced.
- For devices receiving the files, they will need to set a folder for them to save to.
When successfully configured, when any file changes on any one of the devices, the others will automatically bring their files up to date when connected to the Internet.
Setting Up a Device
People usually develop small programs to keep SyncThing running, syncing, and tracking changes. It usually adds an icon to your system tray (by your clock) to track the status of SyncThing.
Windows
- Download Syncthing Tray and install it.
- When finished installing, right click the tray icon and click "Open SyncThing." SyncThing will open in a browser.
Linux/Steam Deck
- Download SyncThingy from Flathub or the Discover Store (on Steam Deck).
- When finished, click on SyncThingy in the tray. SyncThing will open in a browser.
MacOS
- Download and install Syncthing-MacOS. Download the latest DMG, mount it, and install it.
- When finished, click on SyncThing in the tray. Select "Open." SyncThing will open in a browser.
Pairing Devices
As mentioned before, each device that runs SyncThing will get its own ID and pairing code.
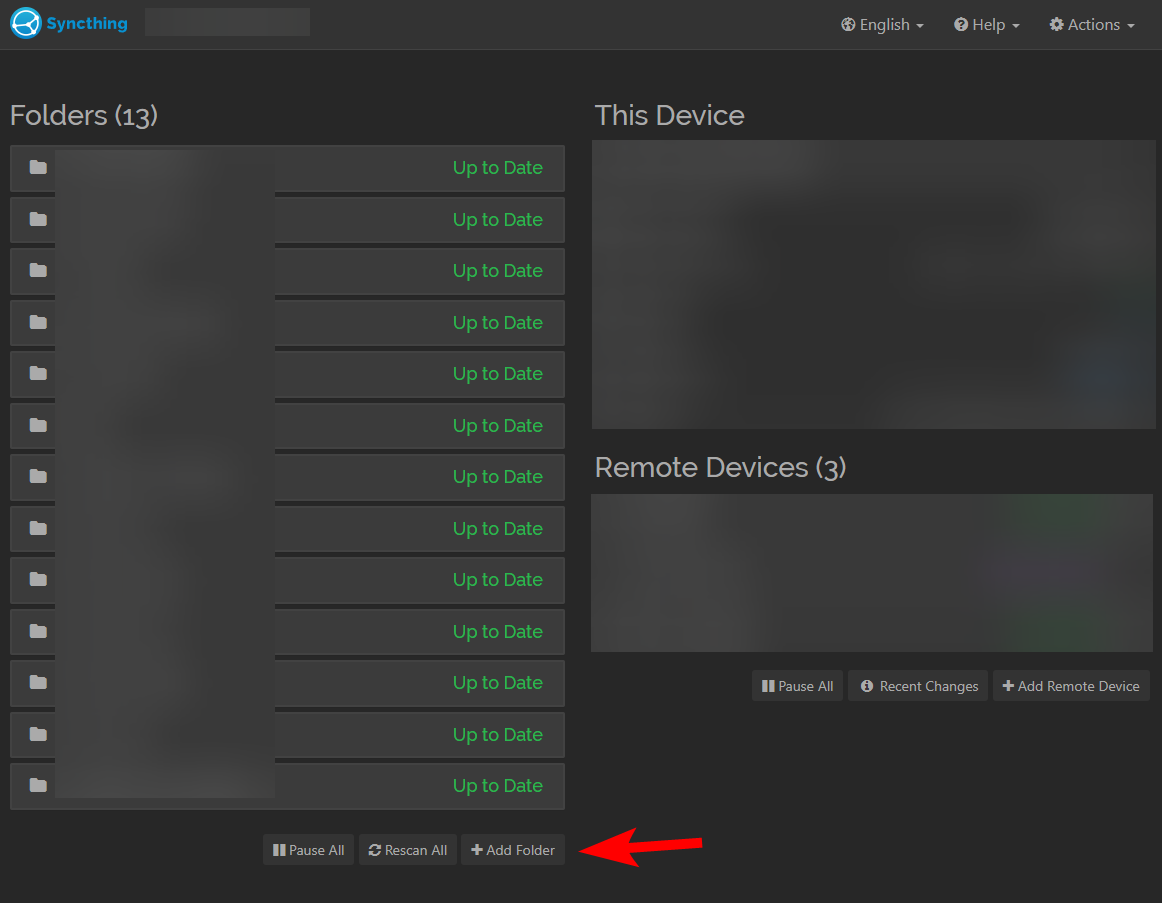
When opening SyncThing, you'll see a screen like this.
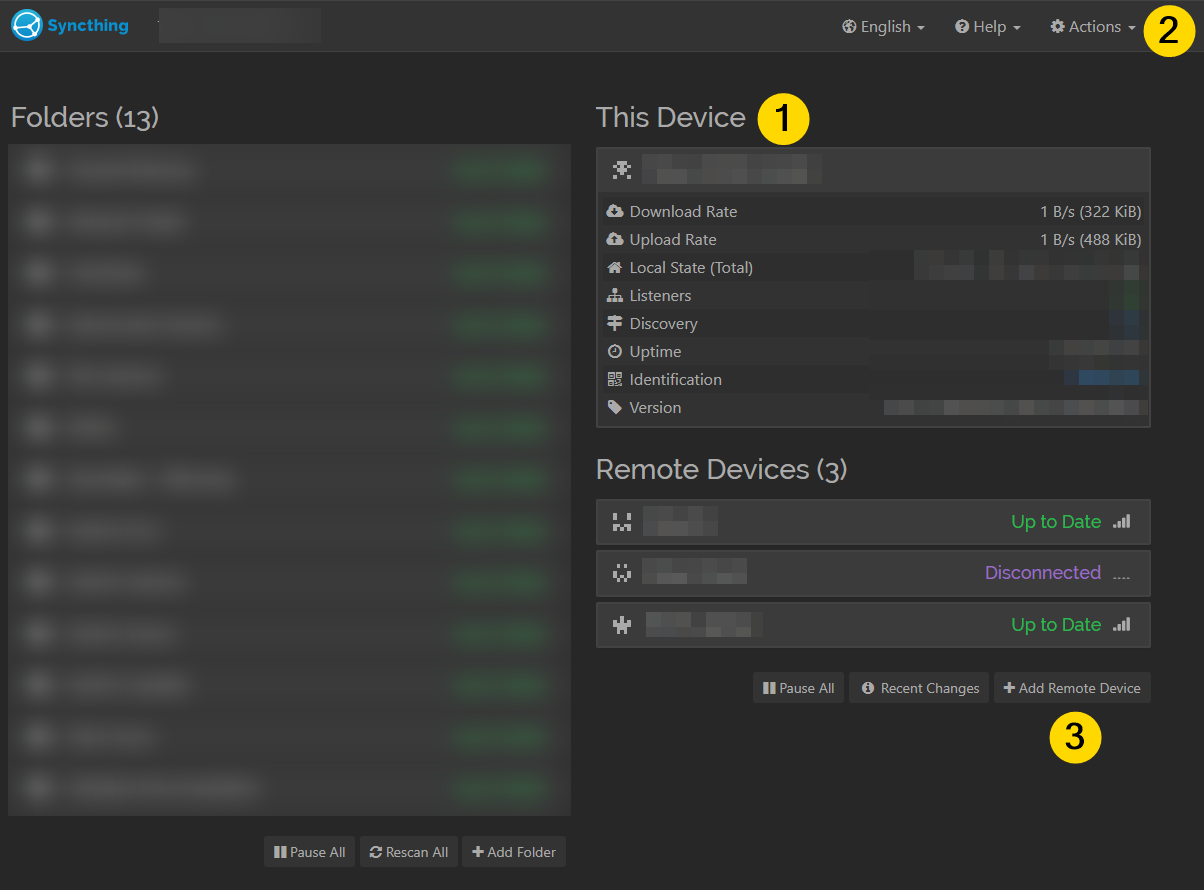
You'll see information about your device in the This Device pane (1).
You can change settings (like renaming your device) via the Actions menu (2).
Once you have multiple devices with SyncThing installed, you can click Add Remote Device to add a new pair (3).
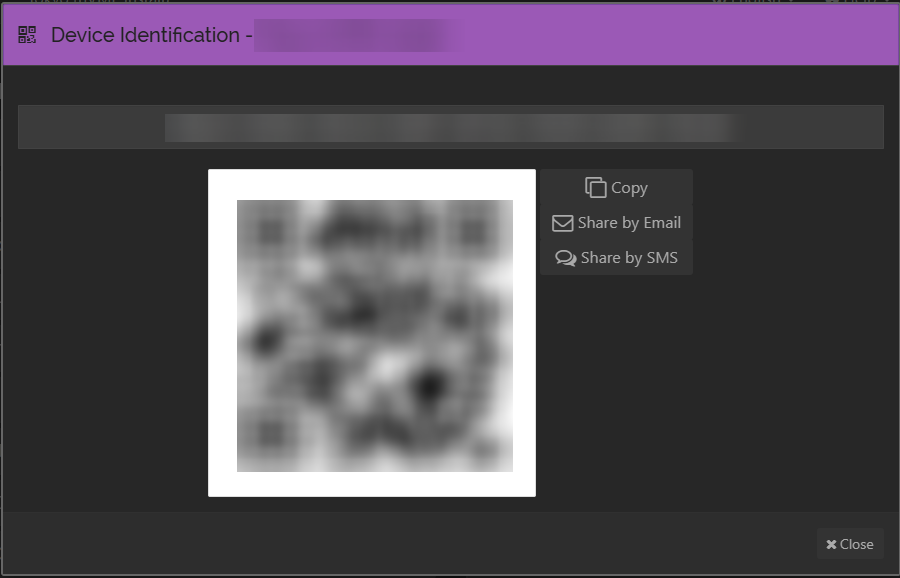
From the Actions Menu, you can also click Show ID.
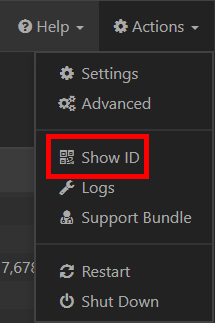
This will show this device's ID and a QR code (for scanning with phone clients).
To pair a device:
- Take the ID code from Device A.
- On Device B, go to
Add Remote Device. - Add Device A's ID in the field, and add a name for the device, then click
Save. - On Device A, accept the pairing request.
Congrats, you've created a pair between devices. You won't have to do the opposite (for Device B and A, respectively).
Creating Folder Pairs
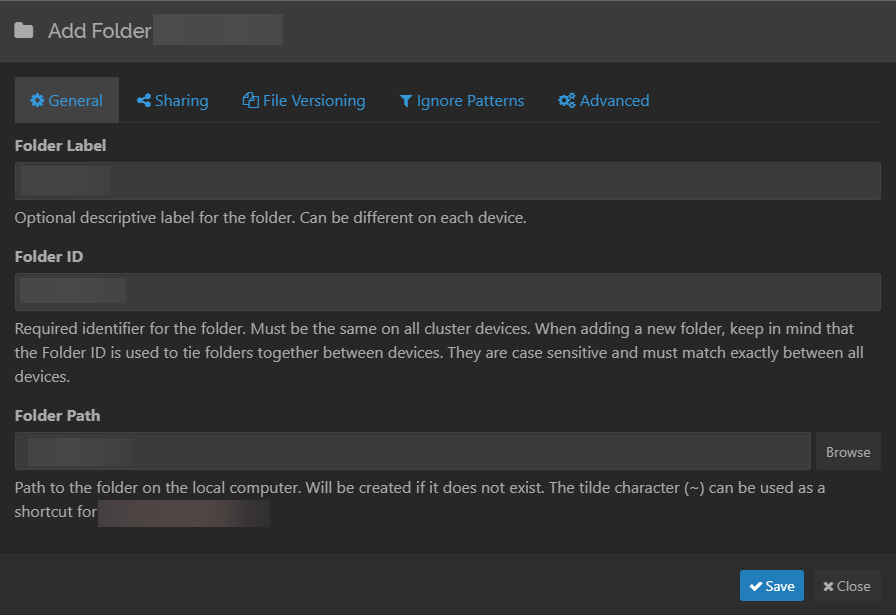
Now that your devices are talking to each other, now you have to give them something to share. On the main SyncThing window, click "Add Folder."
- Add a
Folder Labelfor your Folder. - Leave
Folder IDalone. - For
Folder Path, you need to specify which folder on your computer is to be synced. For example, I have my Ship of Harkinian installation folder atD:\Games\soh\. If I want to sync that entire folder, I would putD:\Games\soh\here.
Warning!
You cannot change the folder directory path after it's been initially set. If you make a mistake or need to move it, you have to delete the folder and then recreate it.
Sharing Folders
While creating a folder or after creating it, you can visit the Sharing tab.
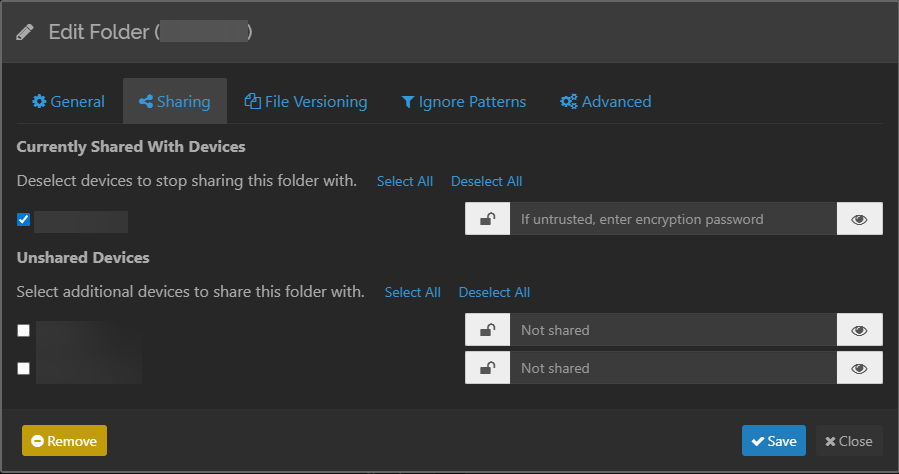
Here, you can see what devices you're sharing the folder with, and add any new ones.
To share the folder with a device, click the checkbox, then hit Save at the bottom.
The device will get a notification on their main Syncthing page.

Accepting it will allow you to set up settings for the device. This means you can have independent filtering and versioning options, per device (see below).
Warning!
You cannot re-set the folder directory path for a shared folder after it's been initially set. If you make a mistake or would like to change it, you'll need to remove the Folder, then re-send a new pairing request from another device that has it set up; this will basically "set it up again for the first time." You can then cut-and-paste the files from the old folder to the new one to save the re-download.
File Versioning
Part of file syncing is redundancy: if you end up making a mistake, or would like to retrieve an earlier version of a file, you need to set this up before you need it.
Go to the File Versioning tab. By changing the dropdown menu here, we can change how Syncthing handles versioning.
Simple File Versioning
I've found that Simple File Versioning works for me:
- If you change a file, it gets moved to a folder within the folder you're syncing, and renamed with a timestamp. This folder defaults to
.stversions, which is likely hidden by default in your file explorer. - I can set up how long I'd like to keep backups.
- I can set up how many backups I'd like to keep (defaults to 5; when a 6th version gets created, the oldest version will be deleted).
- I can set a manual
Versions Path - I can set how often I'd like SyncThing to check for files to be deleted.
Staggered File Versioning
Staggered File Versioning is similar, but a bit more complicated:
The following intervals are used: for the first hour a version is kept every 30 seconds, for the first day a version is kept every hour, for the first 30 days a version is kept every day, until the maximum age a version is kept every week.
If you're constantly saving files and creating new versions for a file, this may be useful to manage your backups over a longer period of time. However, it can lead to unintentionally-deleted files.
You can also set up the maximum age a file can be.
Filtering Files
When creating a folder for the first time, you can't set the Ignored files and folders. You can do that after the folder is initially created. Once created, you'll see the following settings in the folder's Ignore Patterns pane.
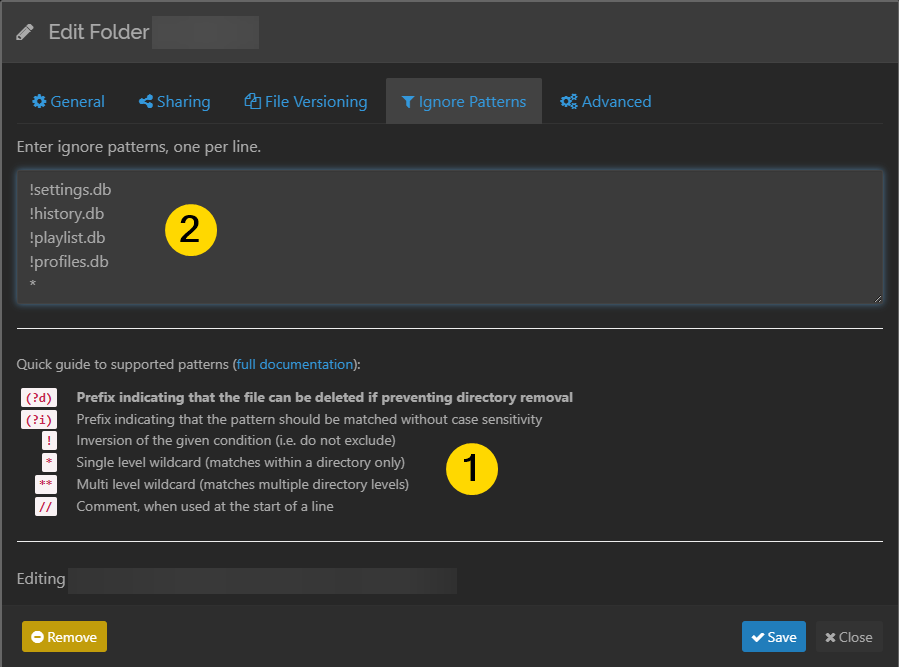
You'll see instructions for ignoring files and folders (1). You'll write patterns into the text box, one per line (2). The instructions most relevant to us are:
`!` Inversion of the given condition (i.e. do not exclude)
`*` Single level wildcard (matches within a directory only)
`**` Multi level wildcard (matches multiple directory levels)
`/` Place before an item to specify a directory
As you can see, I have a could patterns in the screenshot. Some things:
- Rules work from top to bottom. Rules at the bottom will be processed last.
- I mostly have
!rules to say "filter out everything but this.", and then a*at the end, saying "filter out everything else." - In most cases, you're going to be wanting to sync a singular save file or settings file, but not a whole directory. This is primarily when you'd use the
!rule.
An Example Folder
Folder Root/
├── Folder A/
│   └── File C.txt
├── Folder B/
│   └── File D.txt
├── File C.txt
└── File D.txt
In this case, we have a directory with two folders inside of it, and four files. Below, I'll go through some examples of what different text entries would filter.
File C.txtwould ignore both versions ofFile C.txtFile *.txtwould ignore all four files.* D.txtwould ignore both versions ofFile D.txt/File C.txtwould only apply to theFile C.txton the top directory. It would not apply toFolder A/File C.txt./Folder Awould ignore everything inFolder A/Folder *would ignore everything in any directory withFolderat the start of the name.
This is a bit complicated, so I'm going to try to include sections in each game's guide for syncing save files.
Other Options
In the Advanced Tab, you can find a number of other self-descriptive options.
An interesting one is the Folder Type option, which defaults to Send & Receive. This dropdown changes whether a folder sends and receives, or only sends or only receives. This can be useful if you want to be a pure backup (by saying "nothing will be sent, only recieved").